
Counting down to vacation is a great way to get excited for your upcoming trip. With a few supplies and a little creativity you can create your own themed count down calendar in this fun craft. It’s simple and quick – pick your theme, pick your colors and you’re ready to create!
Welcome to this month’s Blogorail Yellow Loop. Today we are sharing Disney DIY projects.
I want you to take a journey with me. I want you to think back a couple of years, to a time when Disney brand paint was exclusively at The Home Depot. You see, once upon a time The Home Depot was my hero. They had those perfect little Mickey shaped paint chips, and my countdown calendars were easy-peasy.
And then one day…they were gone. Poof! Just gone!
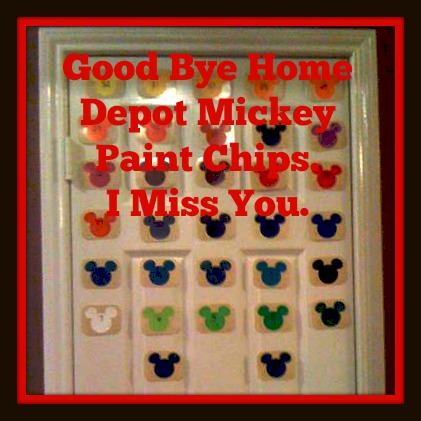
Now what was I going to do? We had a trip in the works and it was about the time we would start our countdown on the hallway closet door. That first Home Depot-less countdown was a nightmare…have you ever cut out 45 individual Mickey shaped pieces of paper? It isn’t fun. And tearing them down breaks your heart a little bit. (3 year olds don’t much care about keeping them in tact).
I knew there had to be an easier way! So I started perusing the Internet and found some great countdown calendars on Etsy. I considered ordering one, but knew that I could make one myself that would be right for my family. So I set off on a trip to Hobby Lobby for supplies and got started just in time for our next trip.
My first attempt turned out pretty well, but the finished product was a bit rough around the edges. Note to all of you, even the pre-cut wood pieces you can buy in the craft section should be sanded.
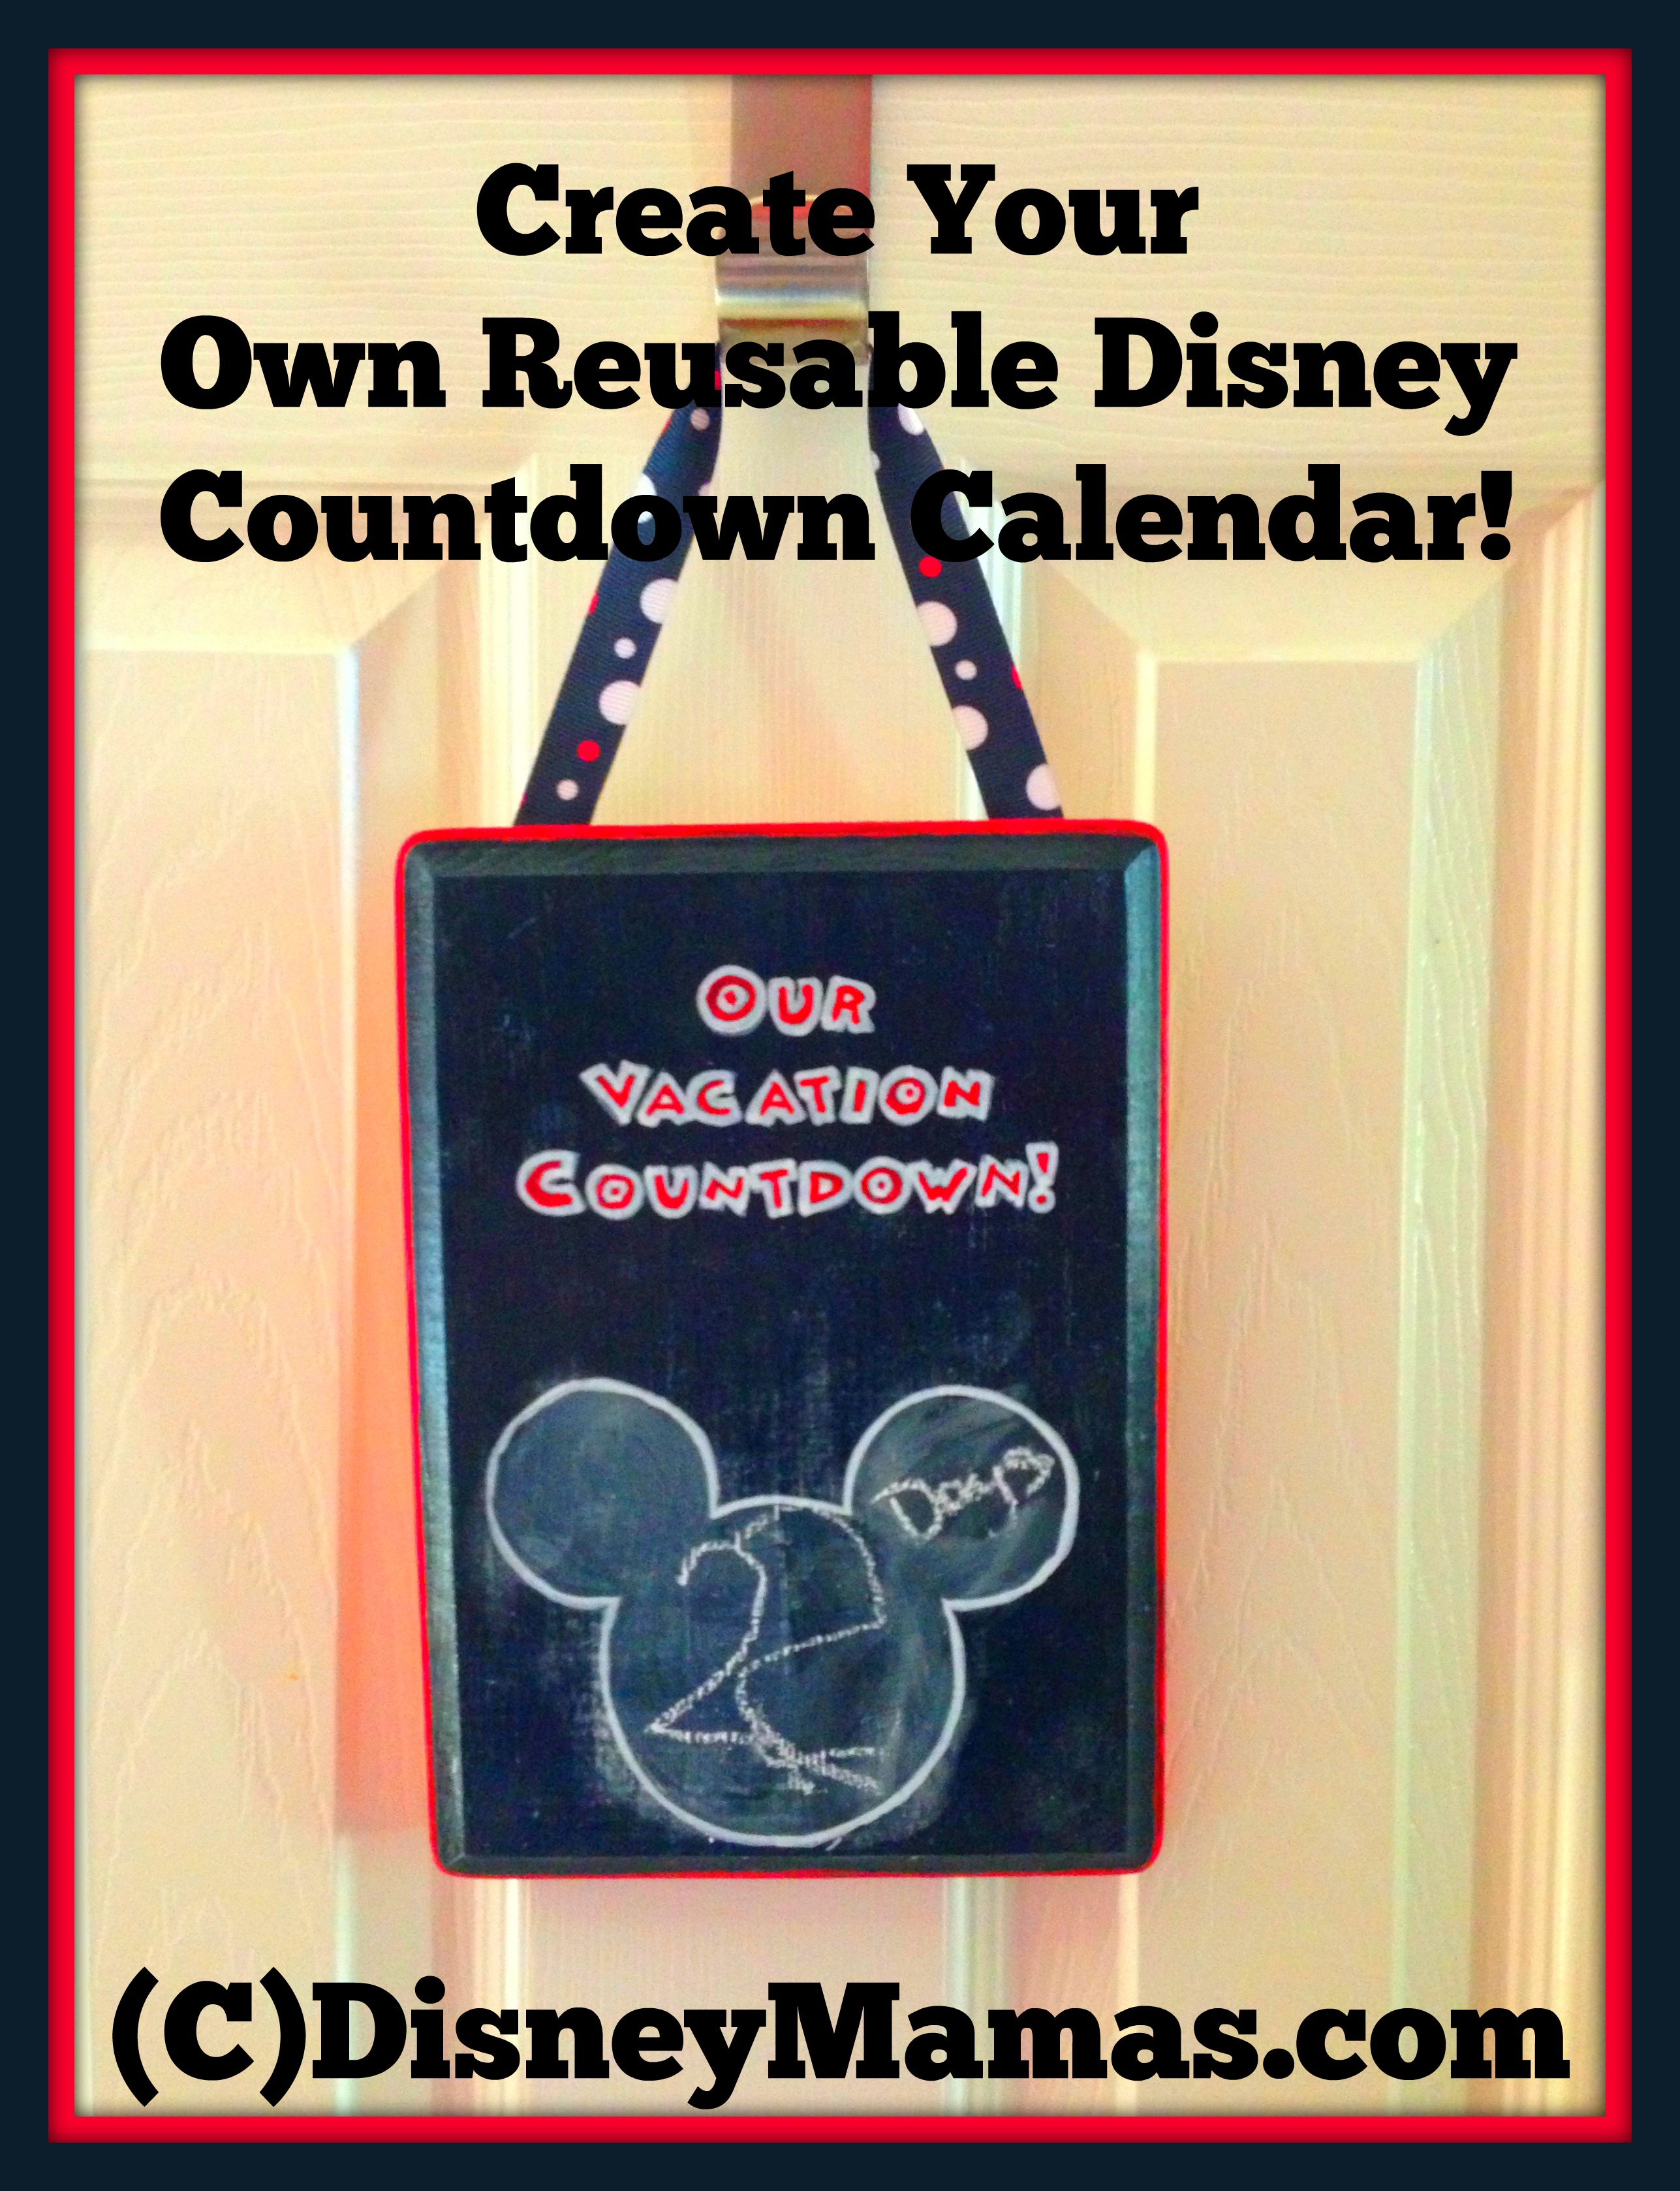
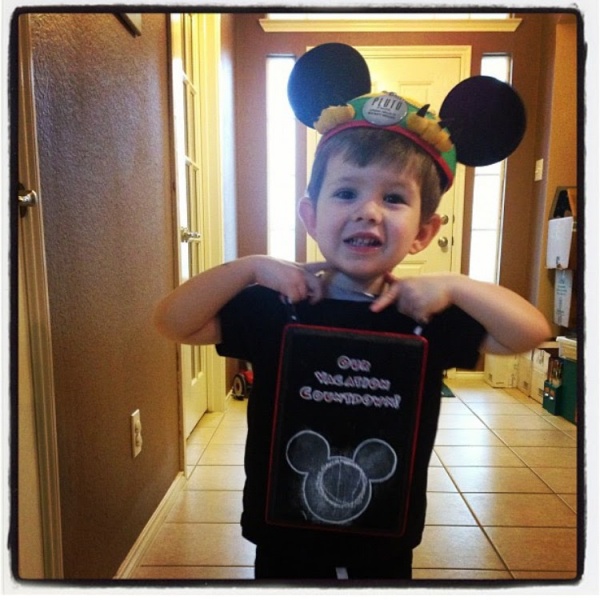
For this edition I used acrylic paint, paint markers, chalkboard paint and ribbon. I actually used my Mickey Mouse sandwich cutter to trace the Mickey head with, and it worked perfectly.
You can see in the picture that the chalk got into the grain of the wood, and it won’t come off. Stubborn chalk.
I have a friend traveling this summer, so I thought it was time to try it again and use what I had learned the first go around. I think this one is pretty cute.
Here’s the How-To!
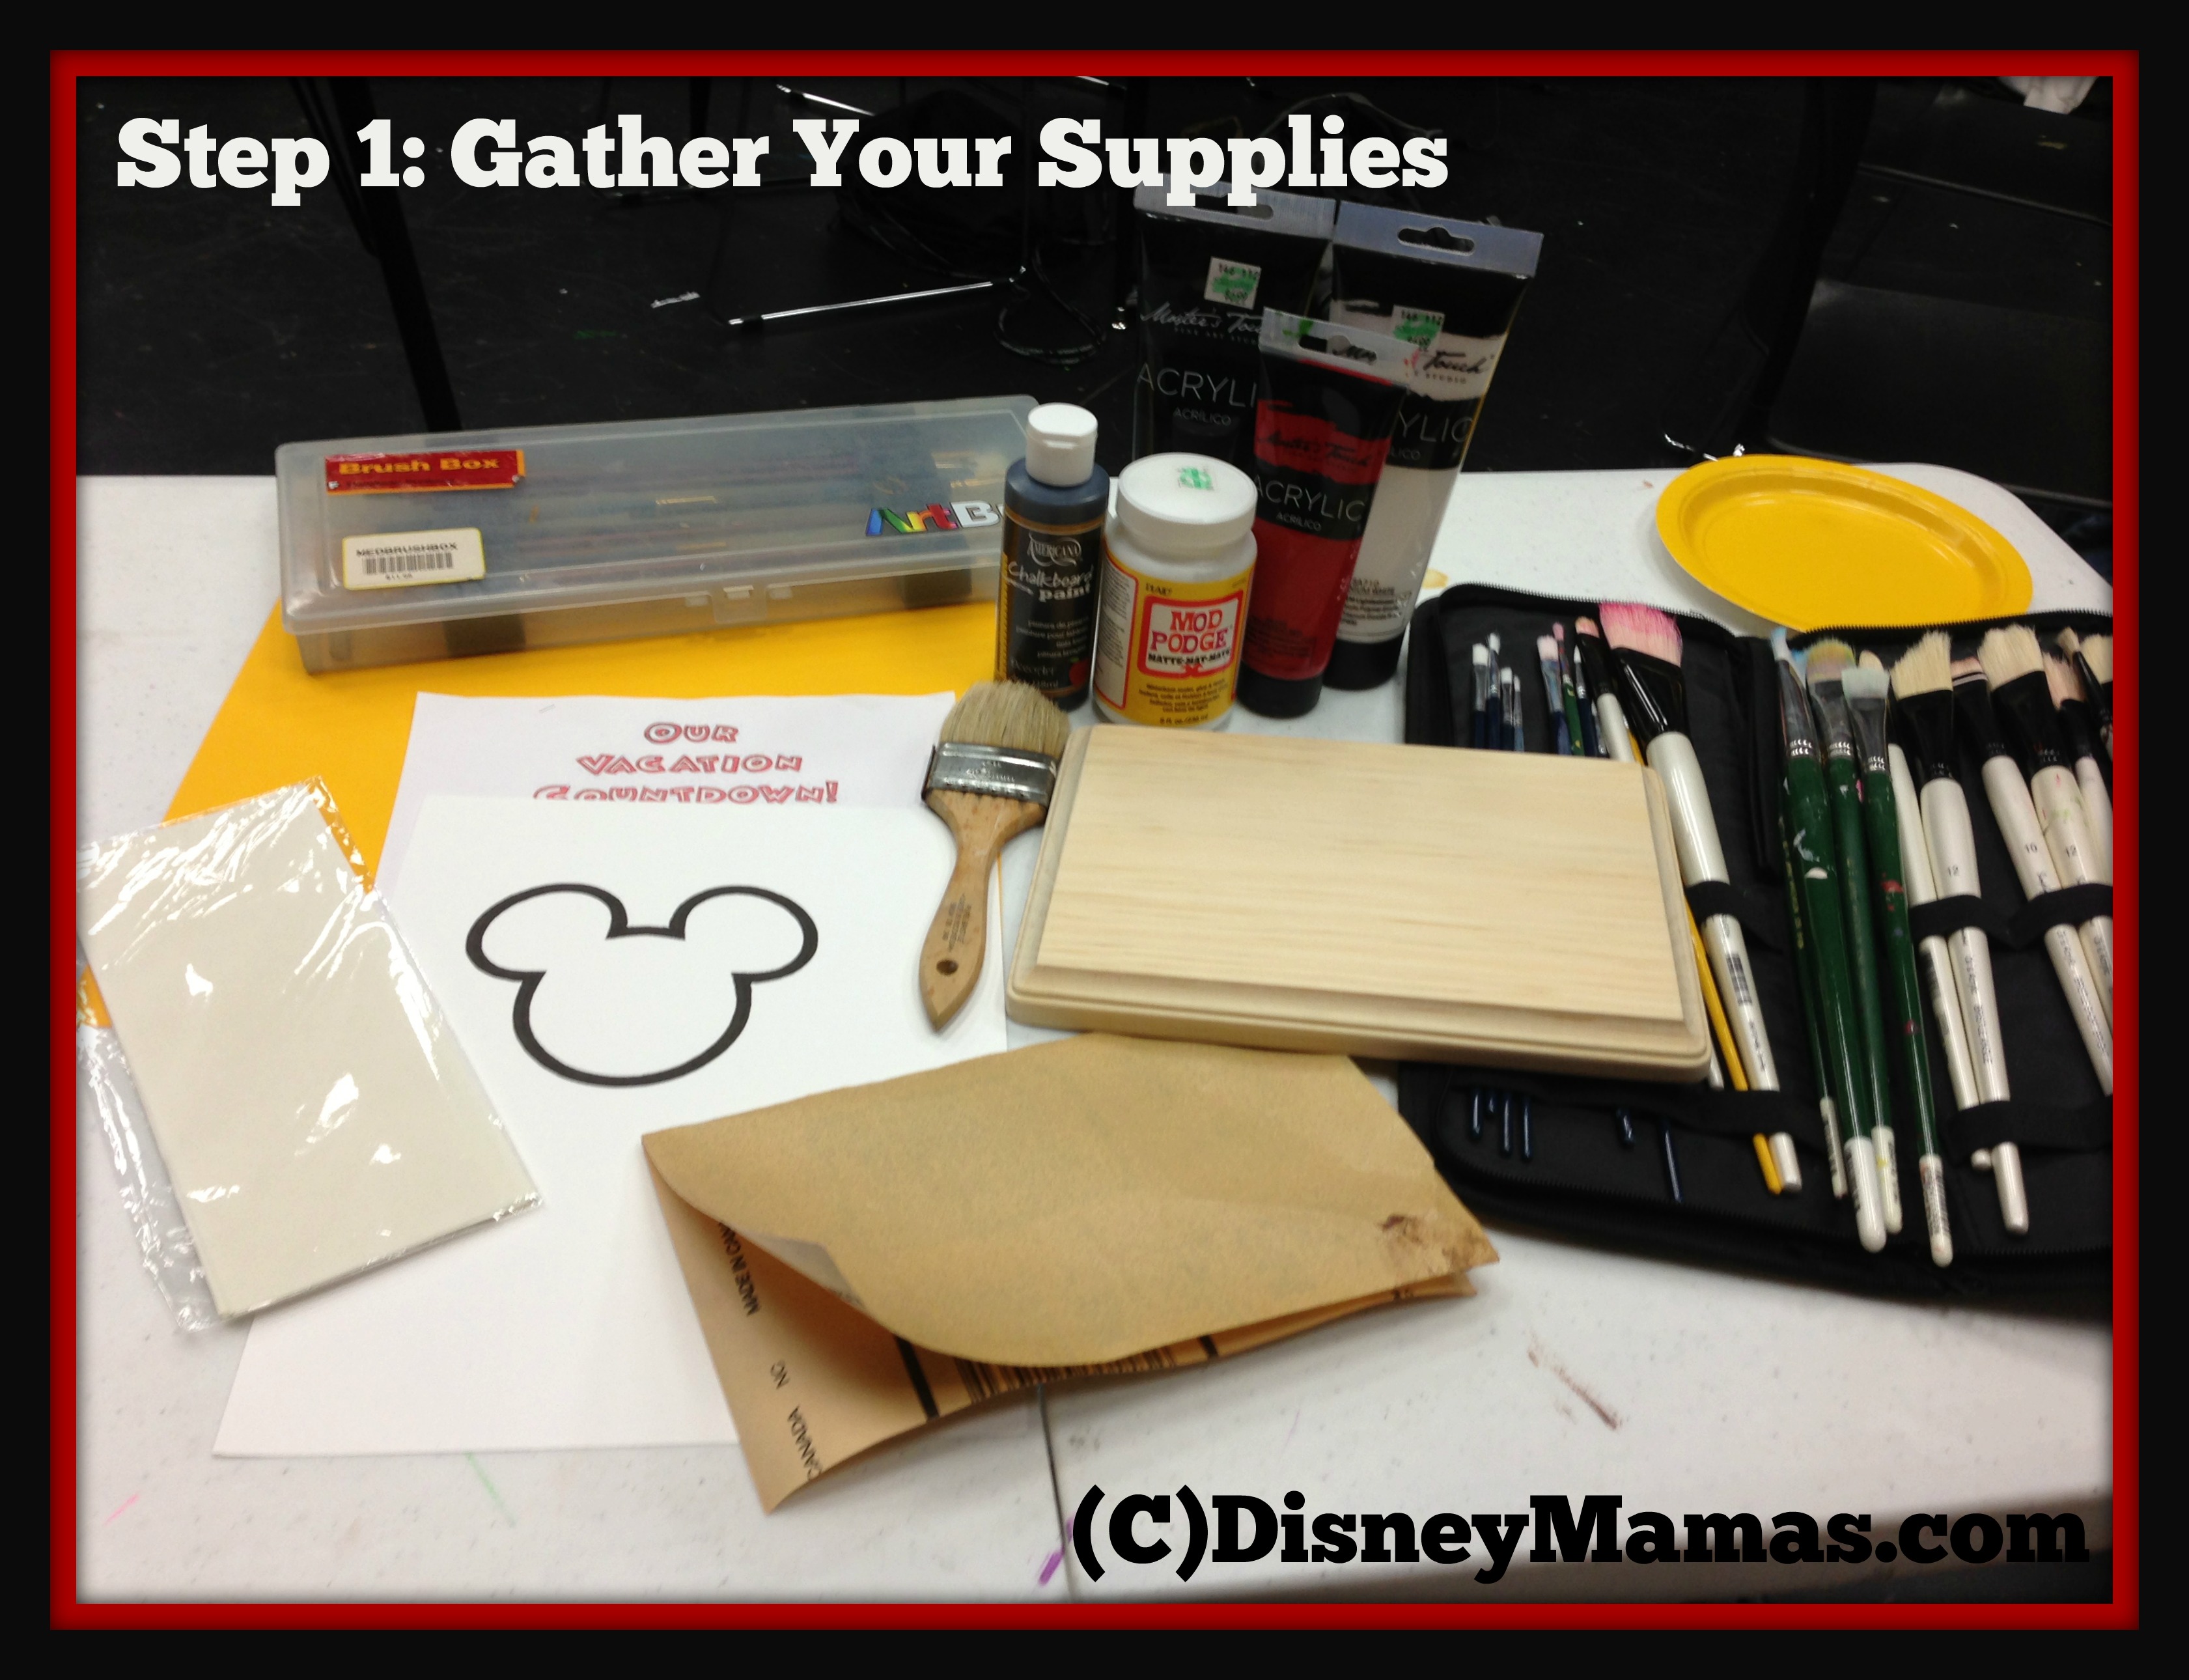
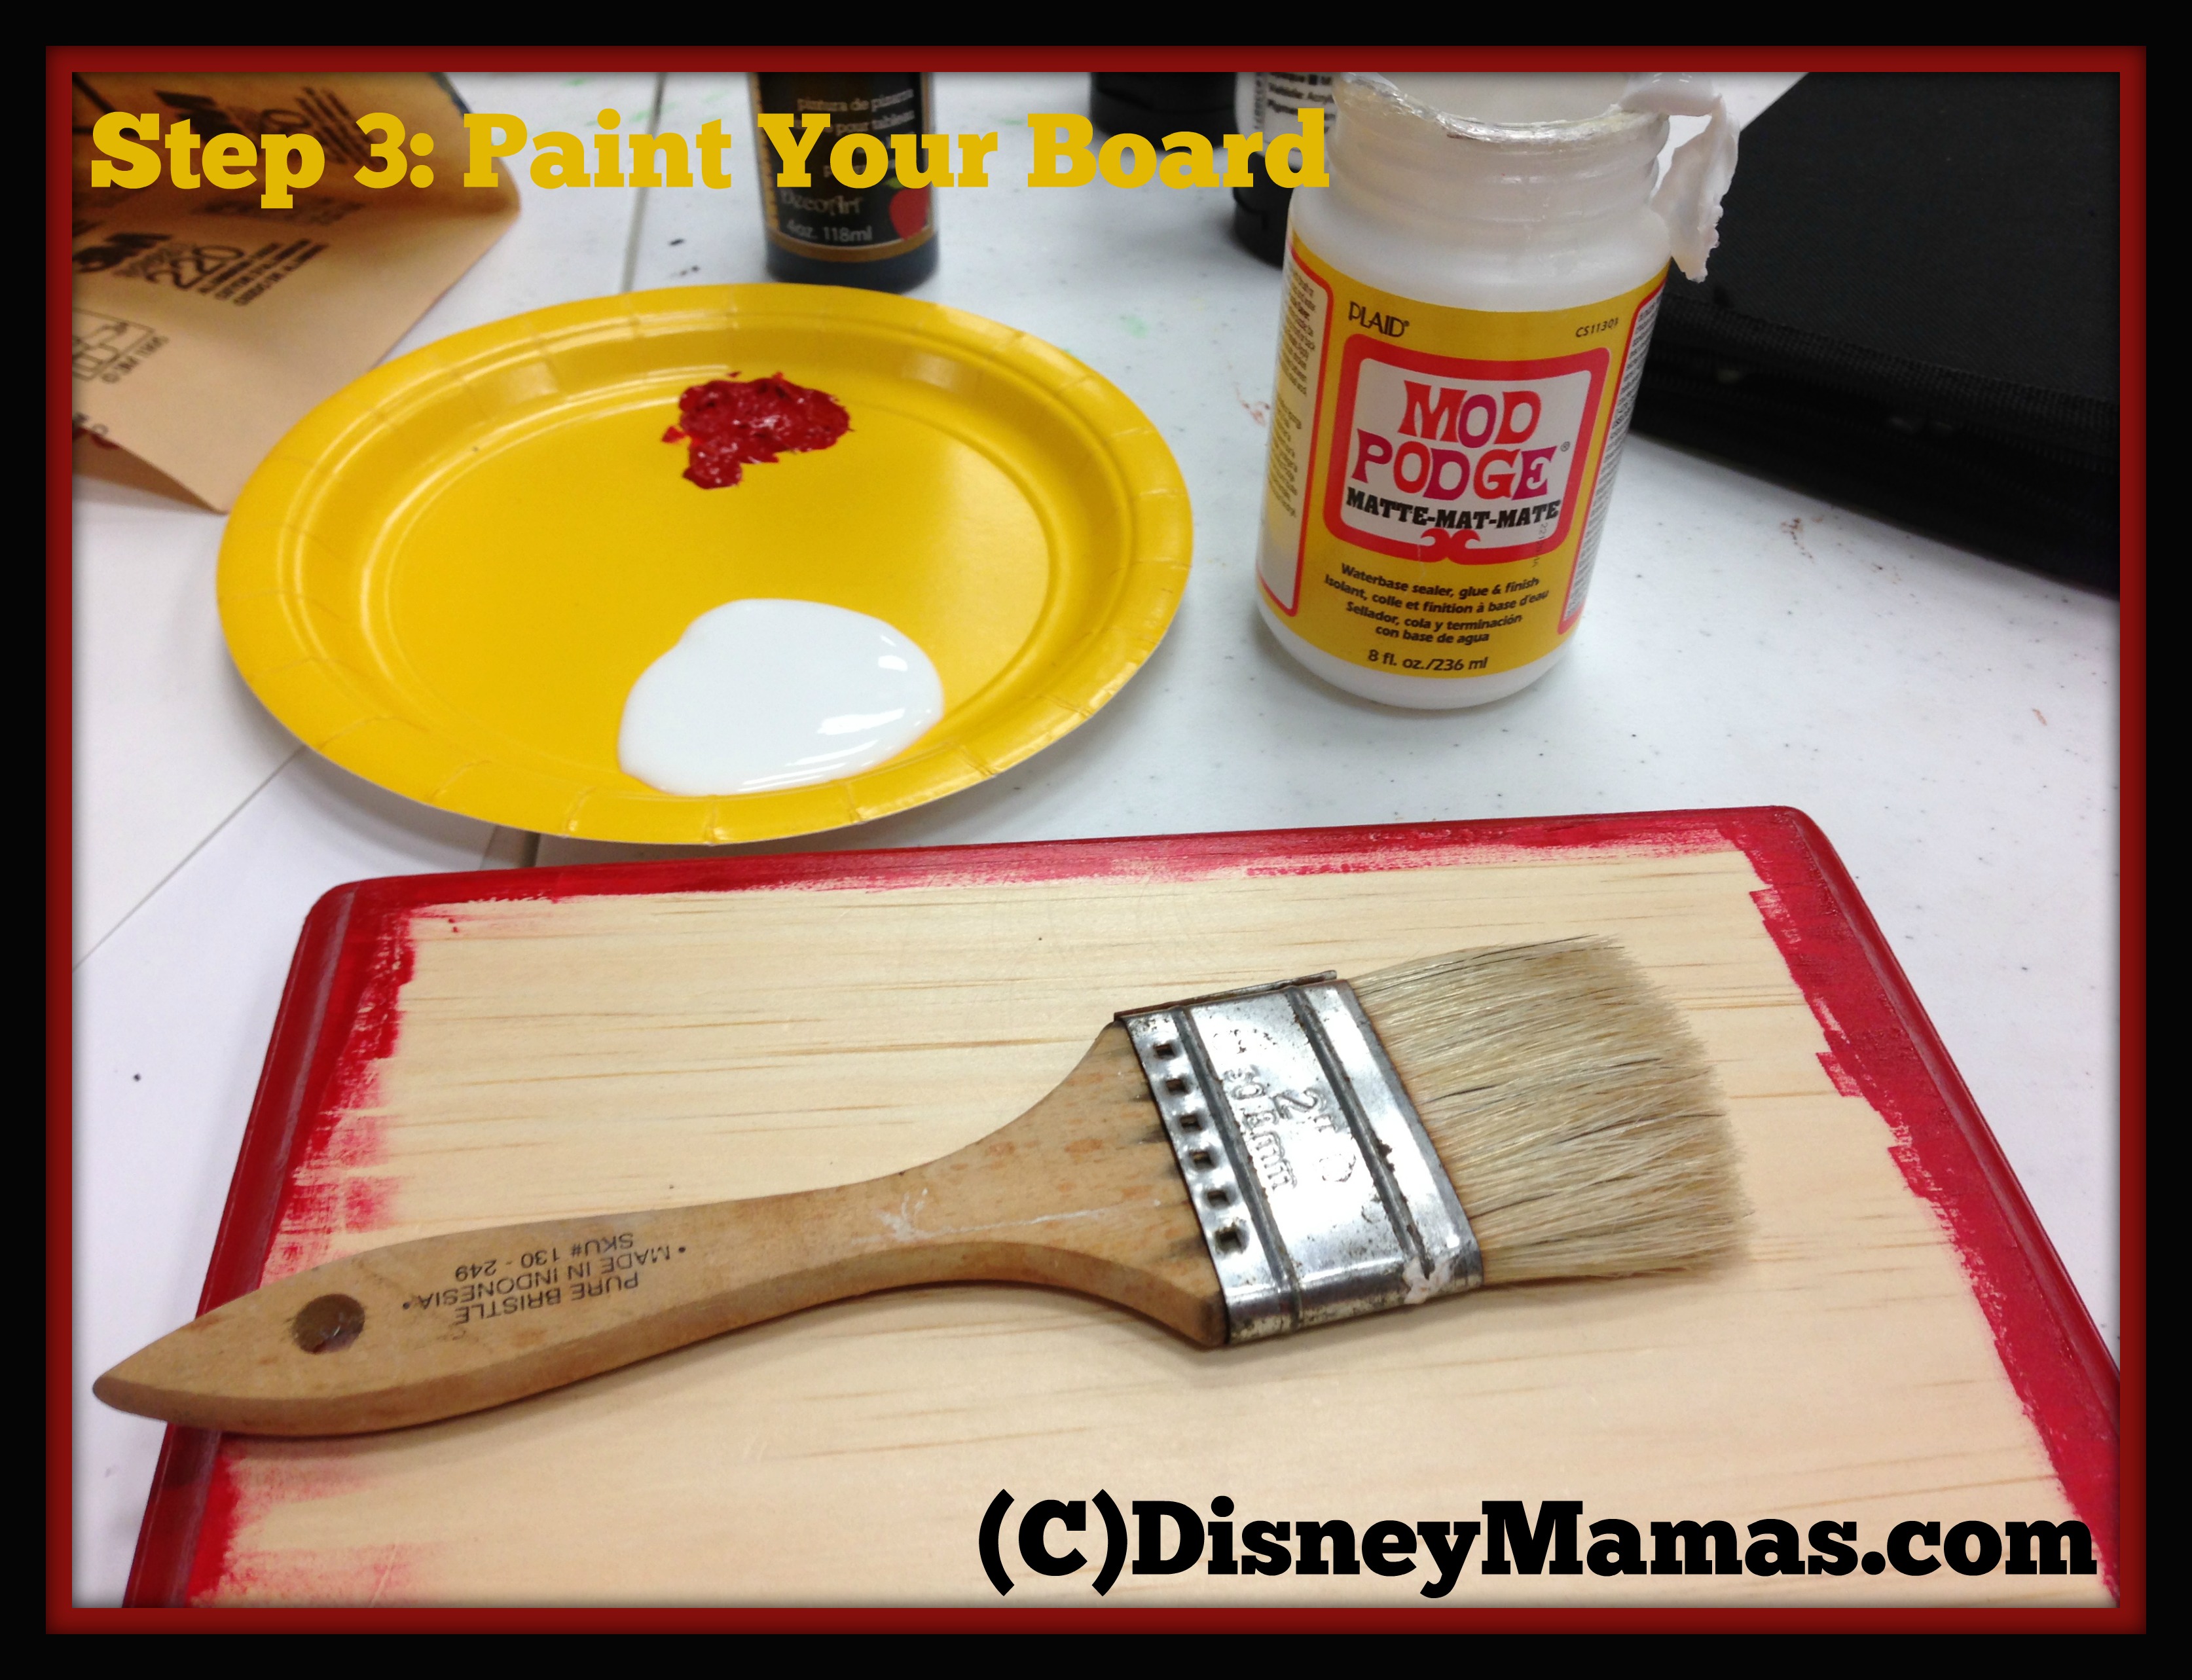
Step One: Gather your supplies.
For this calendar I used a 5×7 board that I purchased at the craft store already beveled around the edges, yellow scrapbook paper, red acrylic paint, black sharpie, Mod Podge, puffy paint, transfer paper and chalkboard paint.
Step Two: Sand your board well, and brush off all sawdust with a paintbrush. Then wipe down with a wet paper towel and allow to dry.
Step Three: Paint the board, or just the edges of the board depending on what kind of surface you are going to use.
If you are going to paint the entire surface skip steps four and five.
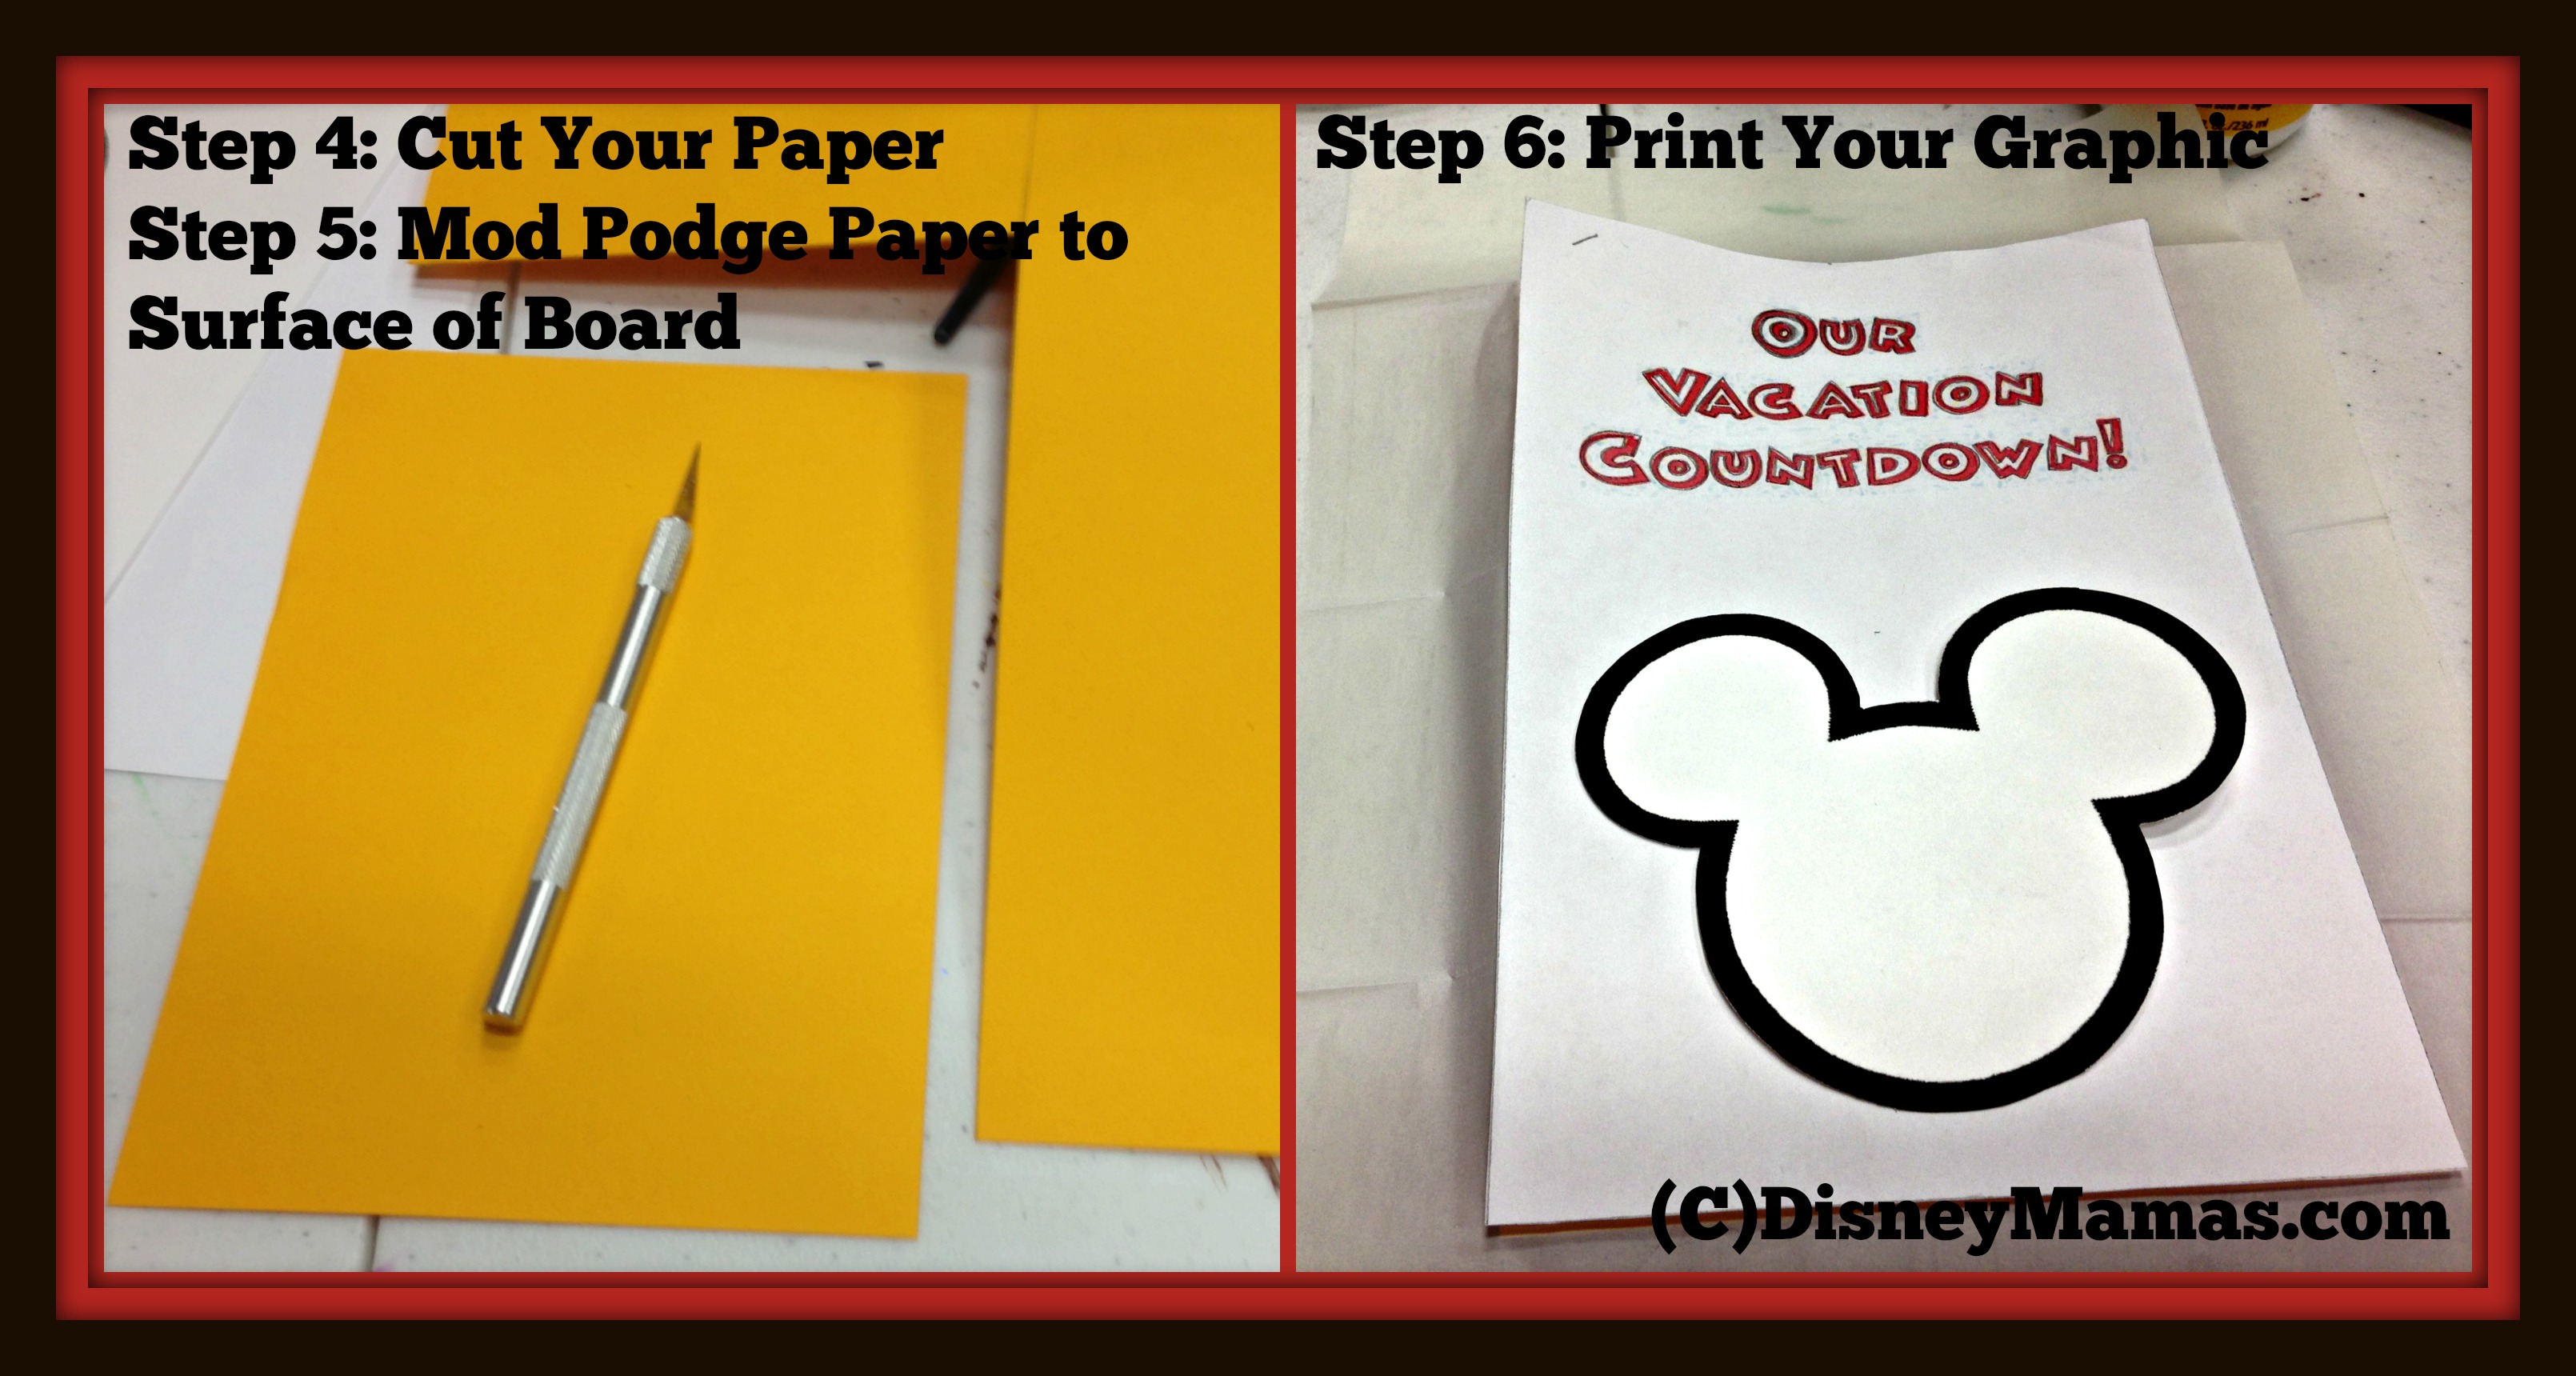
Step Four: Measure the face of the board and cut out the shape of the board using an X-Acto knife with a sharp blade. You can uses scissors, but I find that you will get a much cleaner cut with the knife.
Step Five: Mod Podge the paper to the top of the board, being careful to avoid creases.
Step Six: Print your text and or images, making sure that they fit just right on your surface. Don’t worry about printing in color.
Step Seven: Lay your transfer paper down on the face of the calendar. Make sure that it is tight with no wrinkles. Lay your text down on top of the transfer paper and make sure it is centered on your face. Make sure it is just where you want it to be placed, and then tape it down around the edges so it does not move on you. Using a ballpoint pen trace the text and any shapes you use. The transfer paper will transfer the image to the surface of your calendar. (Make sure the transfer paper is facing the right direction). Remove the paper and transfer paper and inspect your design. Make any adjustments necessary very lightly.
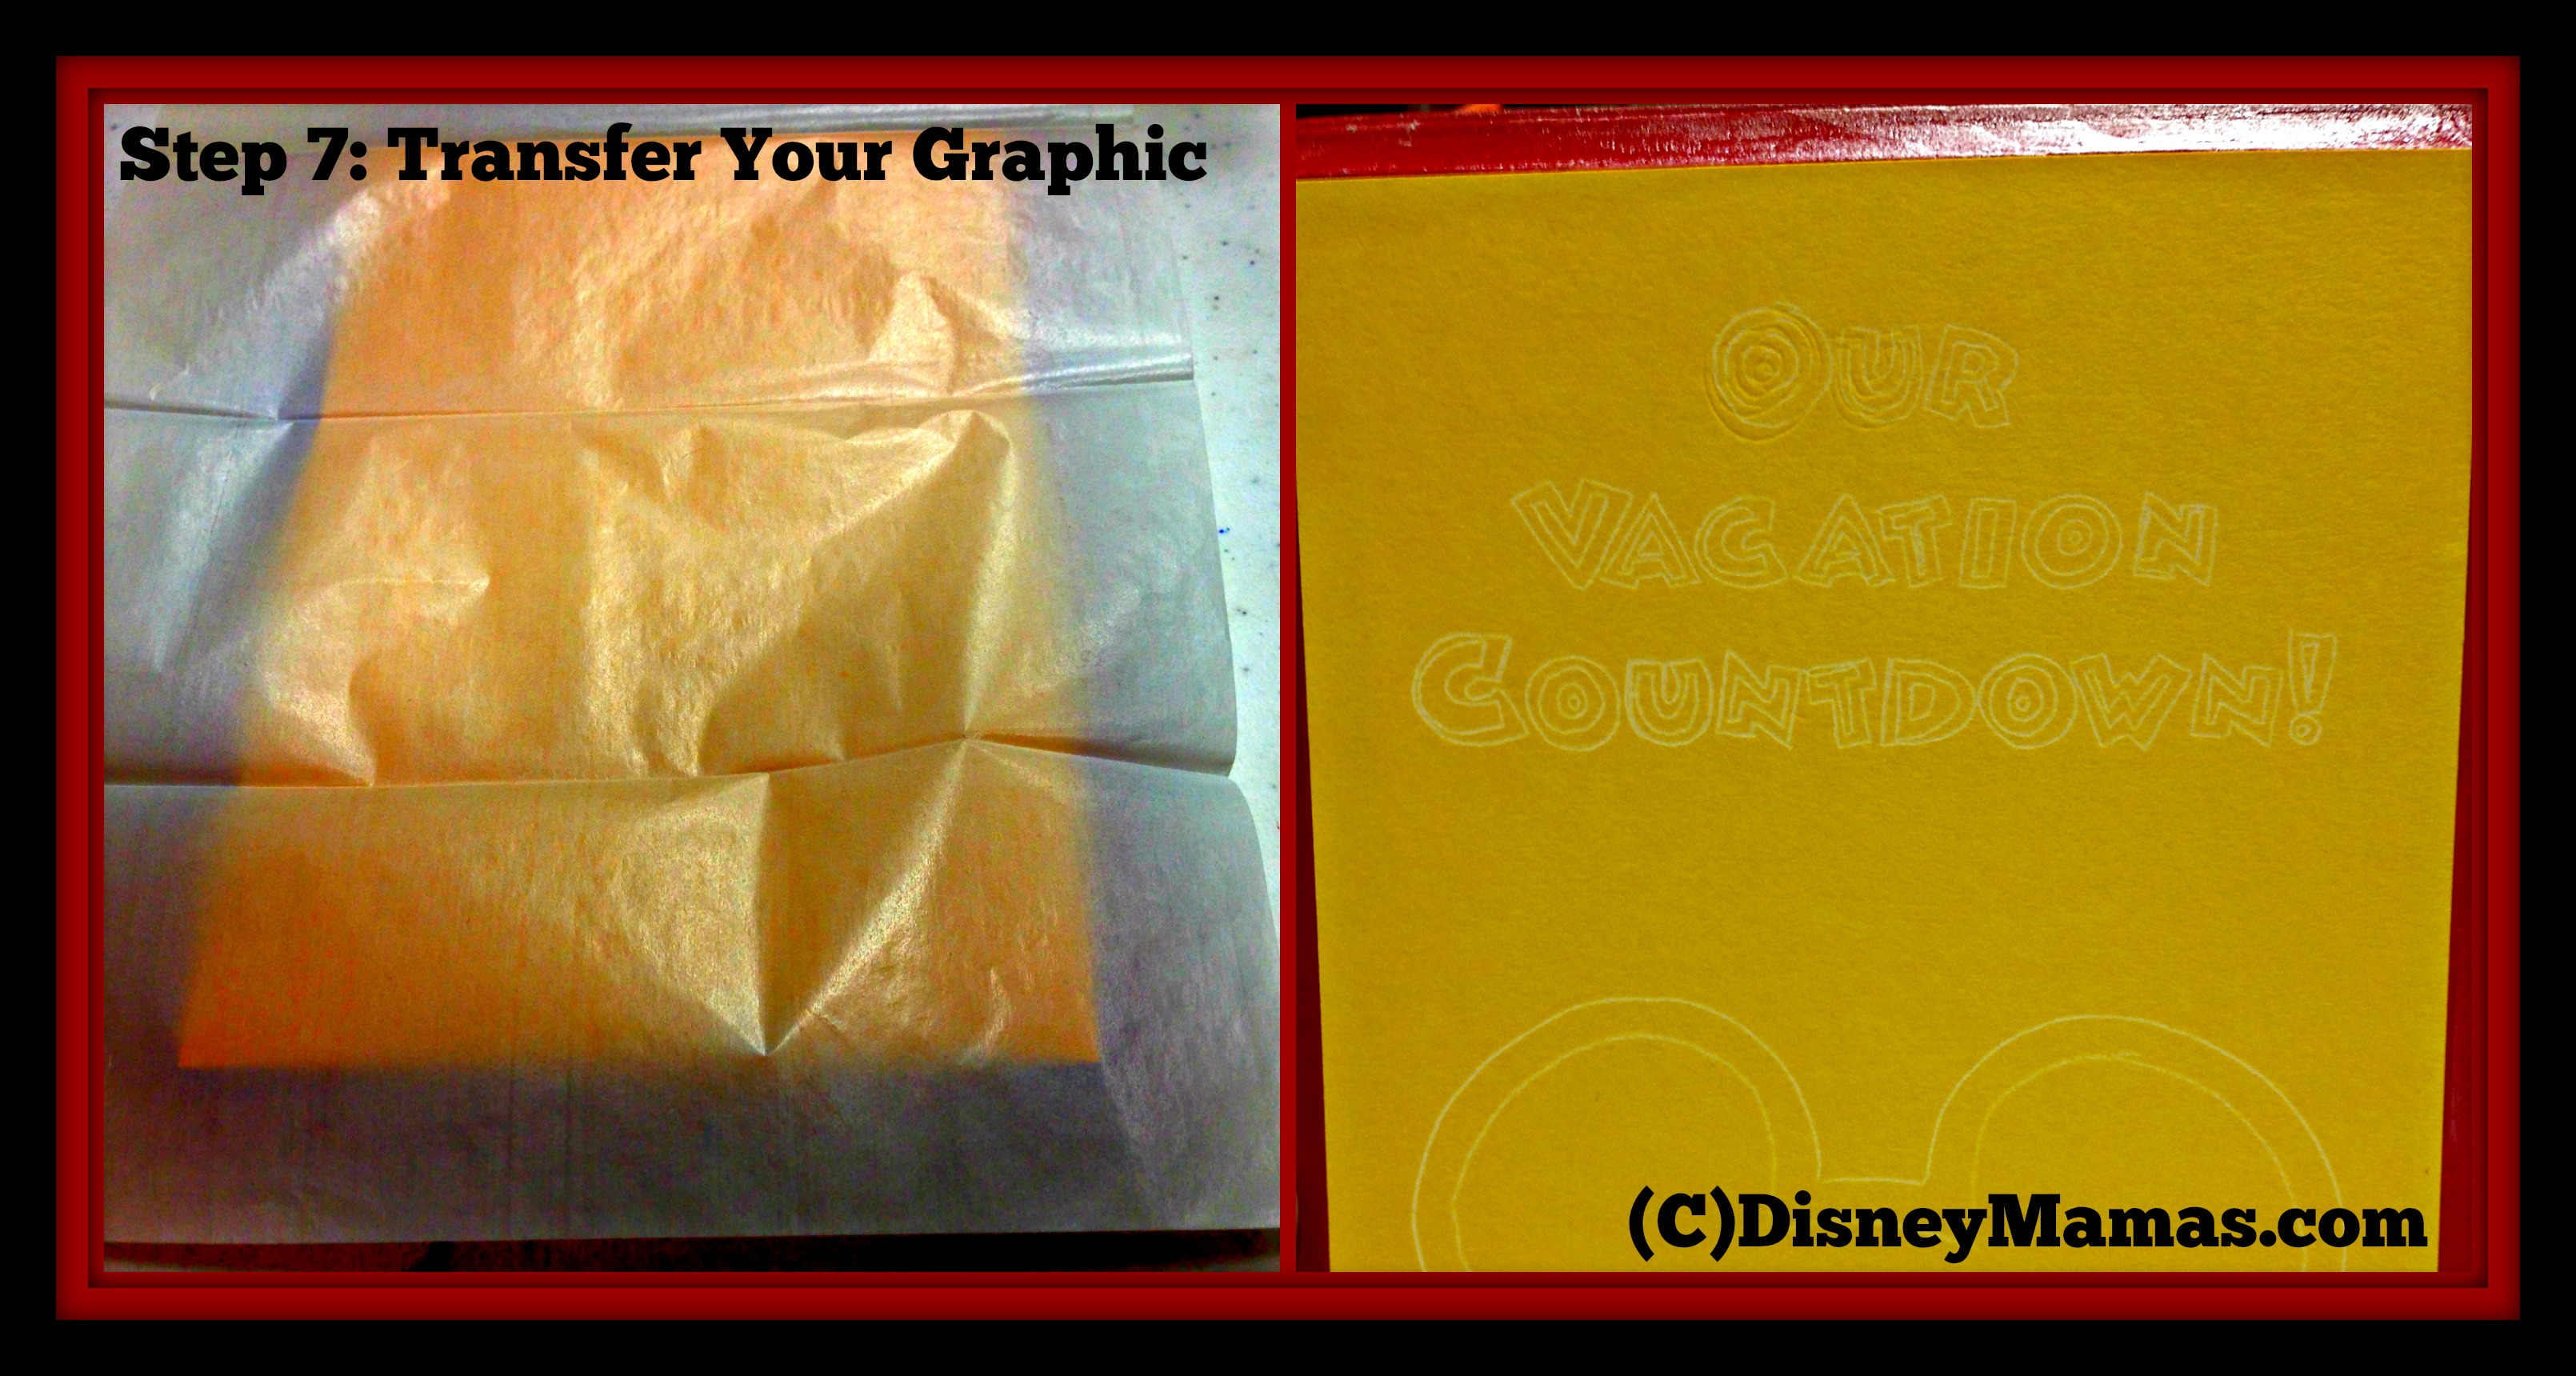 (I had to really adjust the colors in these two pictures so you could see the surface beneath the transfer paper)
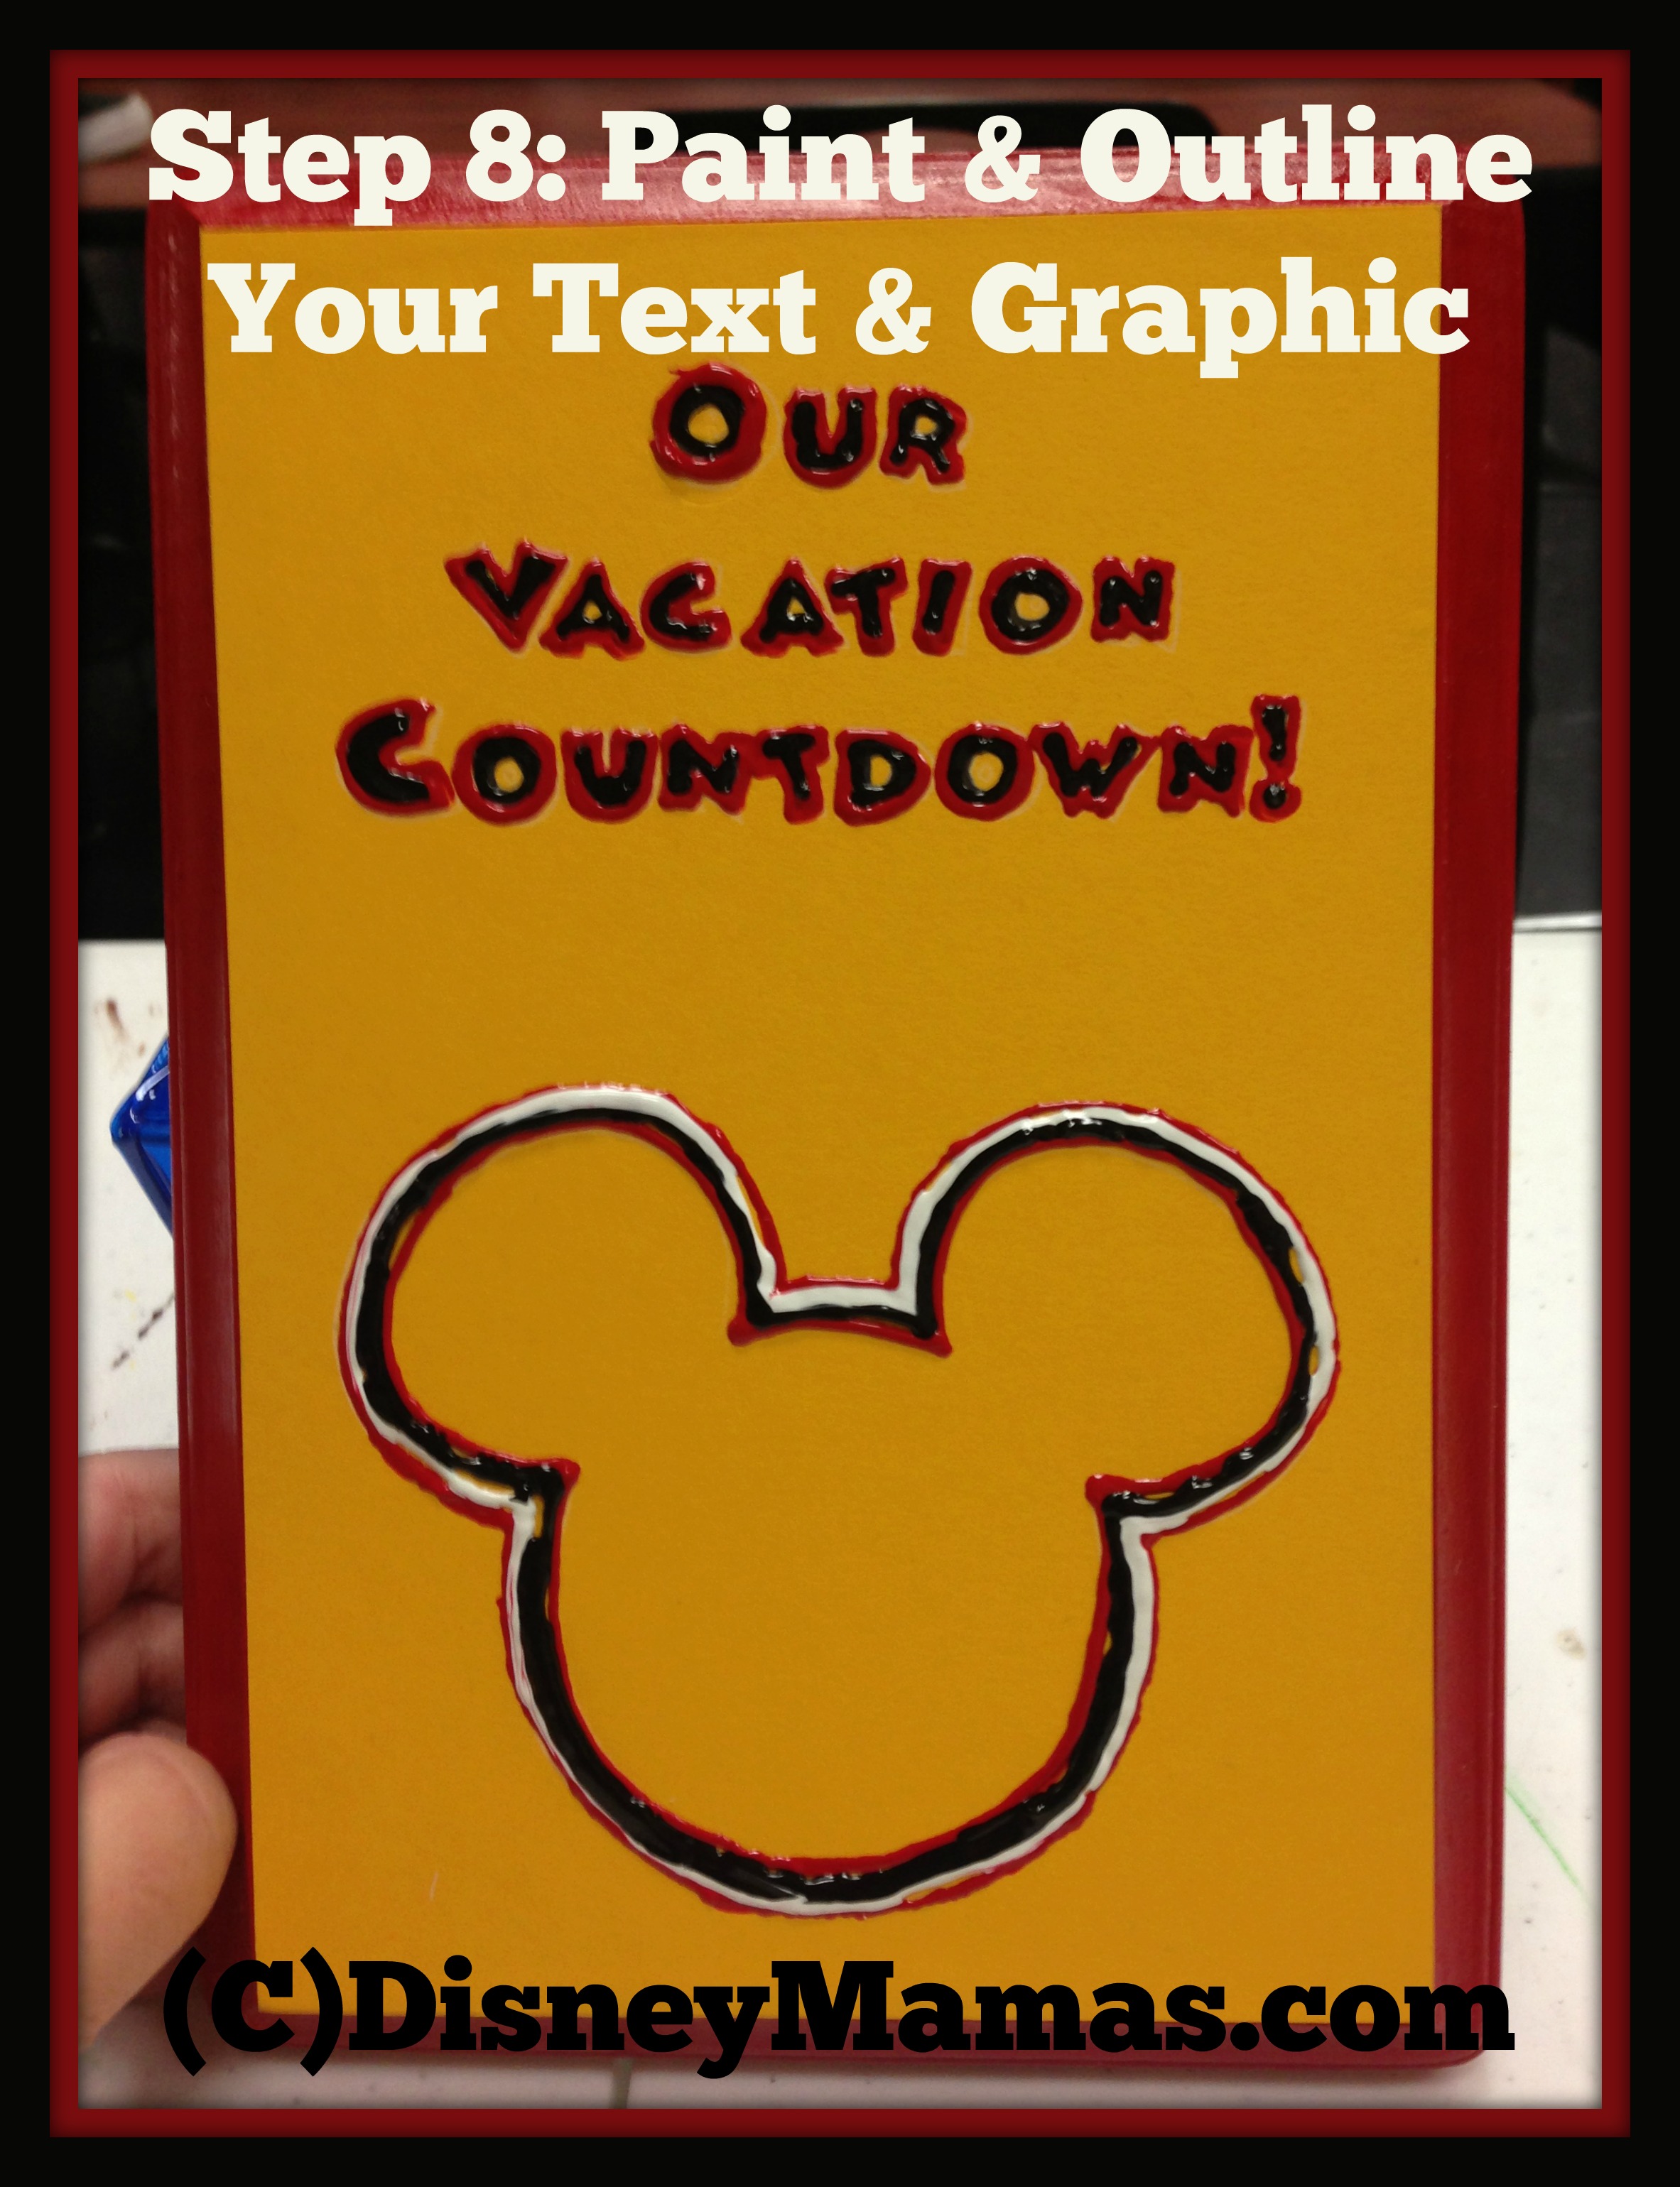
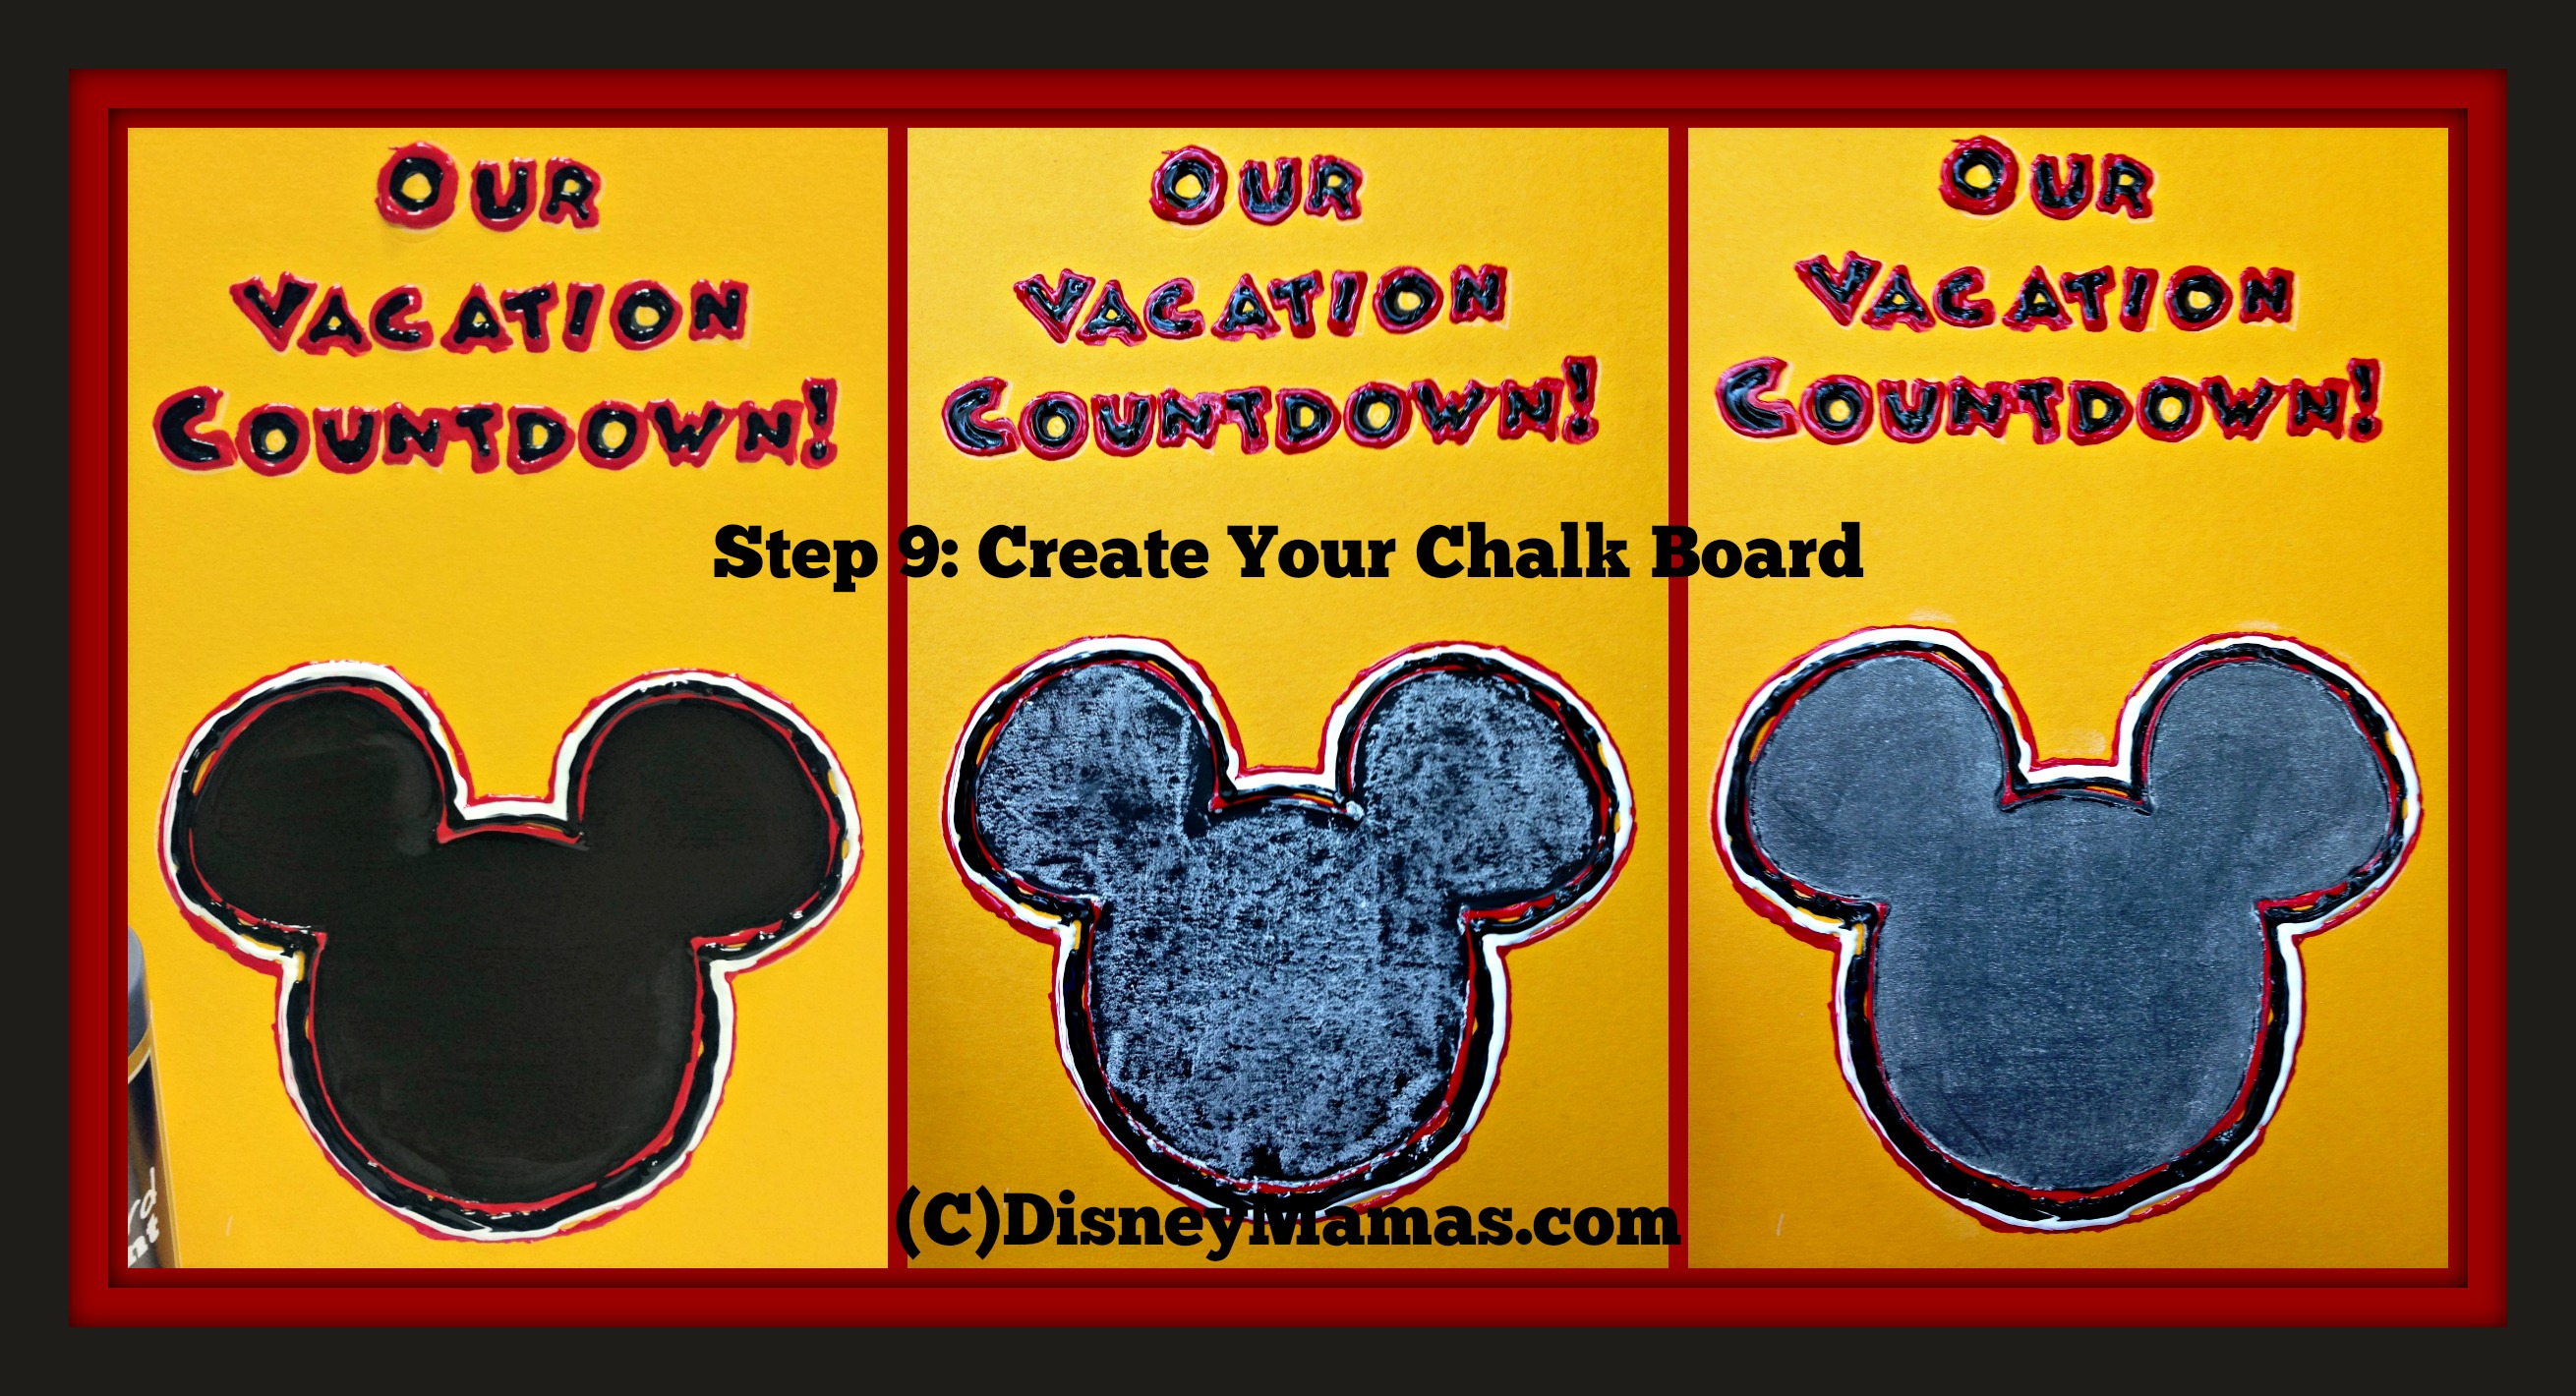
Step Eight: Once you are satisfied with your transfer, begin going over your text with whatever medium you prefer. For my first calendar I used paint pens, and they worked much, much better than the puffy paint. Puffy Paint is difficult to control. Now, go around the outside edges of what will become your chalkboard.
*Note: While the Puffy Paint was difficult to work with, it did create a nice barrier between the chalk board and the rest of the calendar.
Step Nine: Once your chalkboard outline fill it in with chalkboard paint. Follow the directions on the bottle so that you allow the paint to cure correctly. My paint took two coats, plus 24 hours of cure time. Then it said to rub it with chalk and let it cure overnight before rubbing in to create the chalkboard surface.
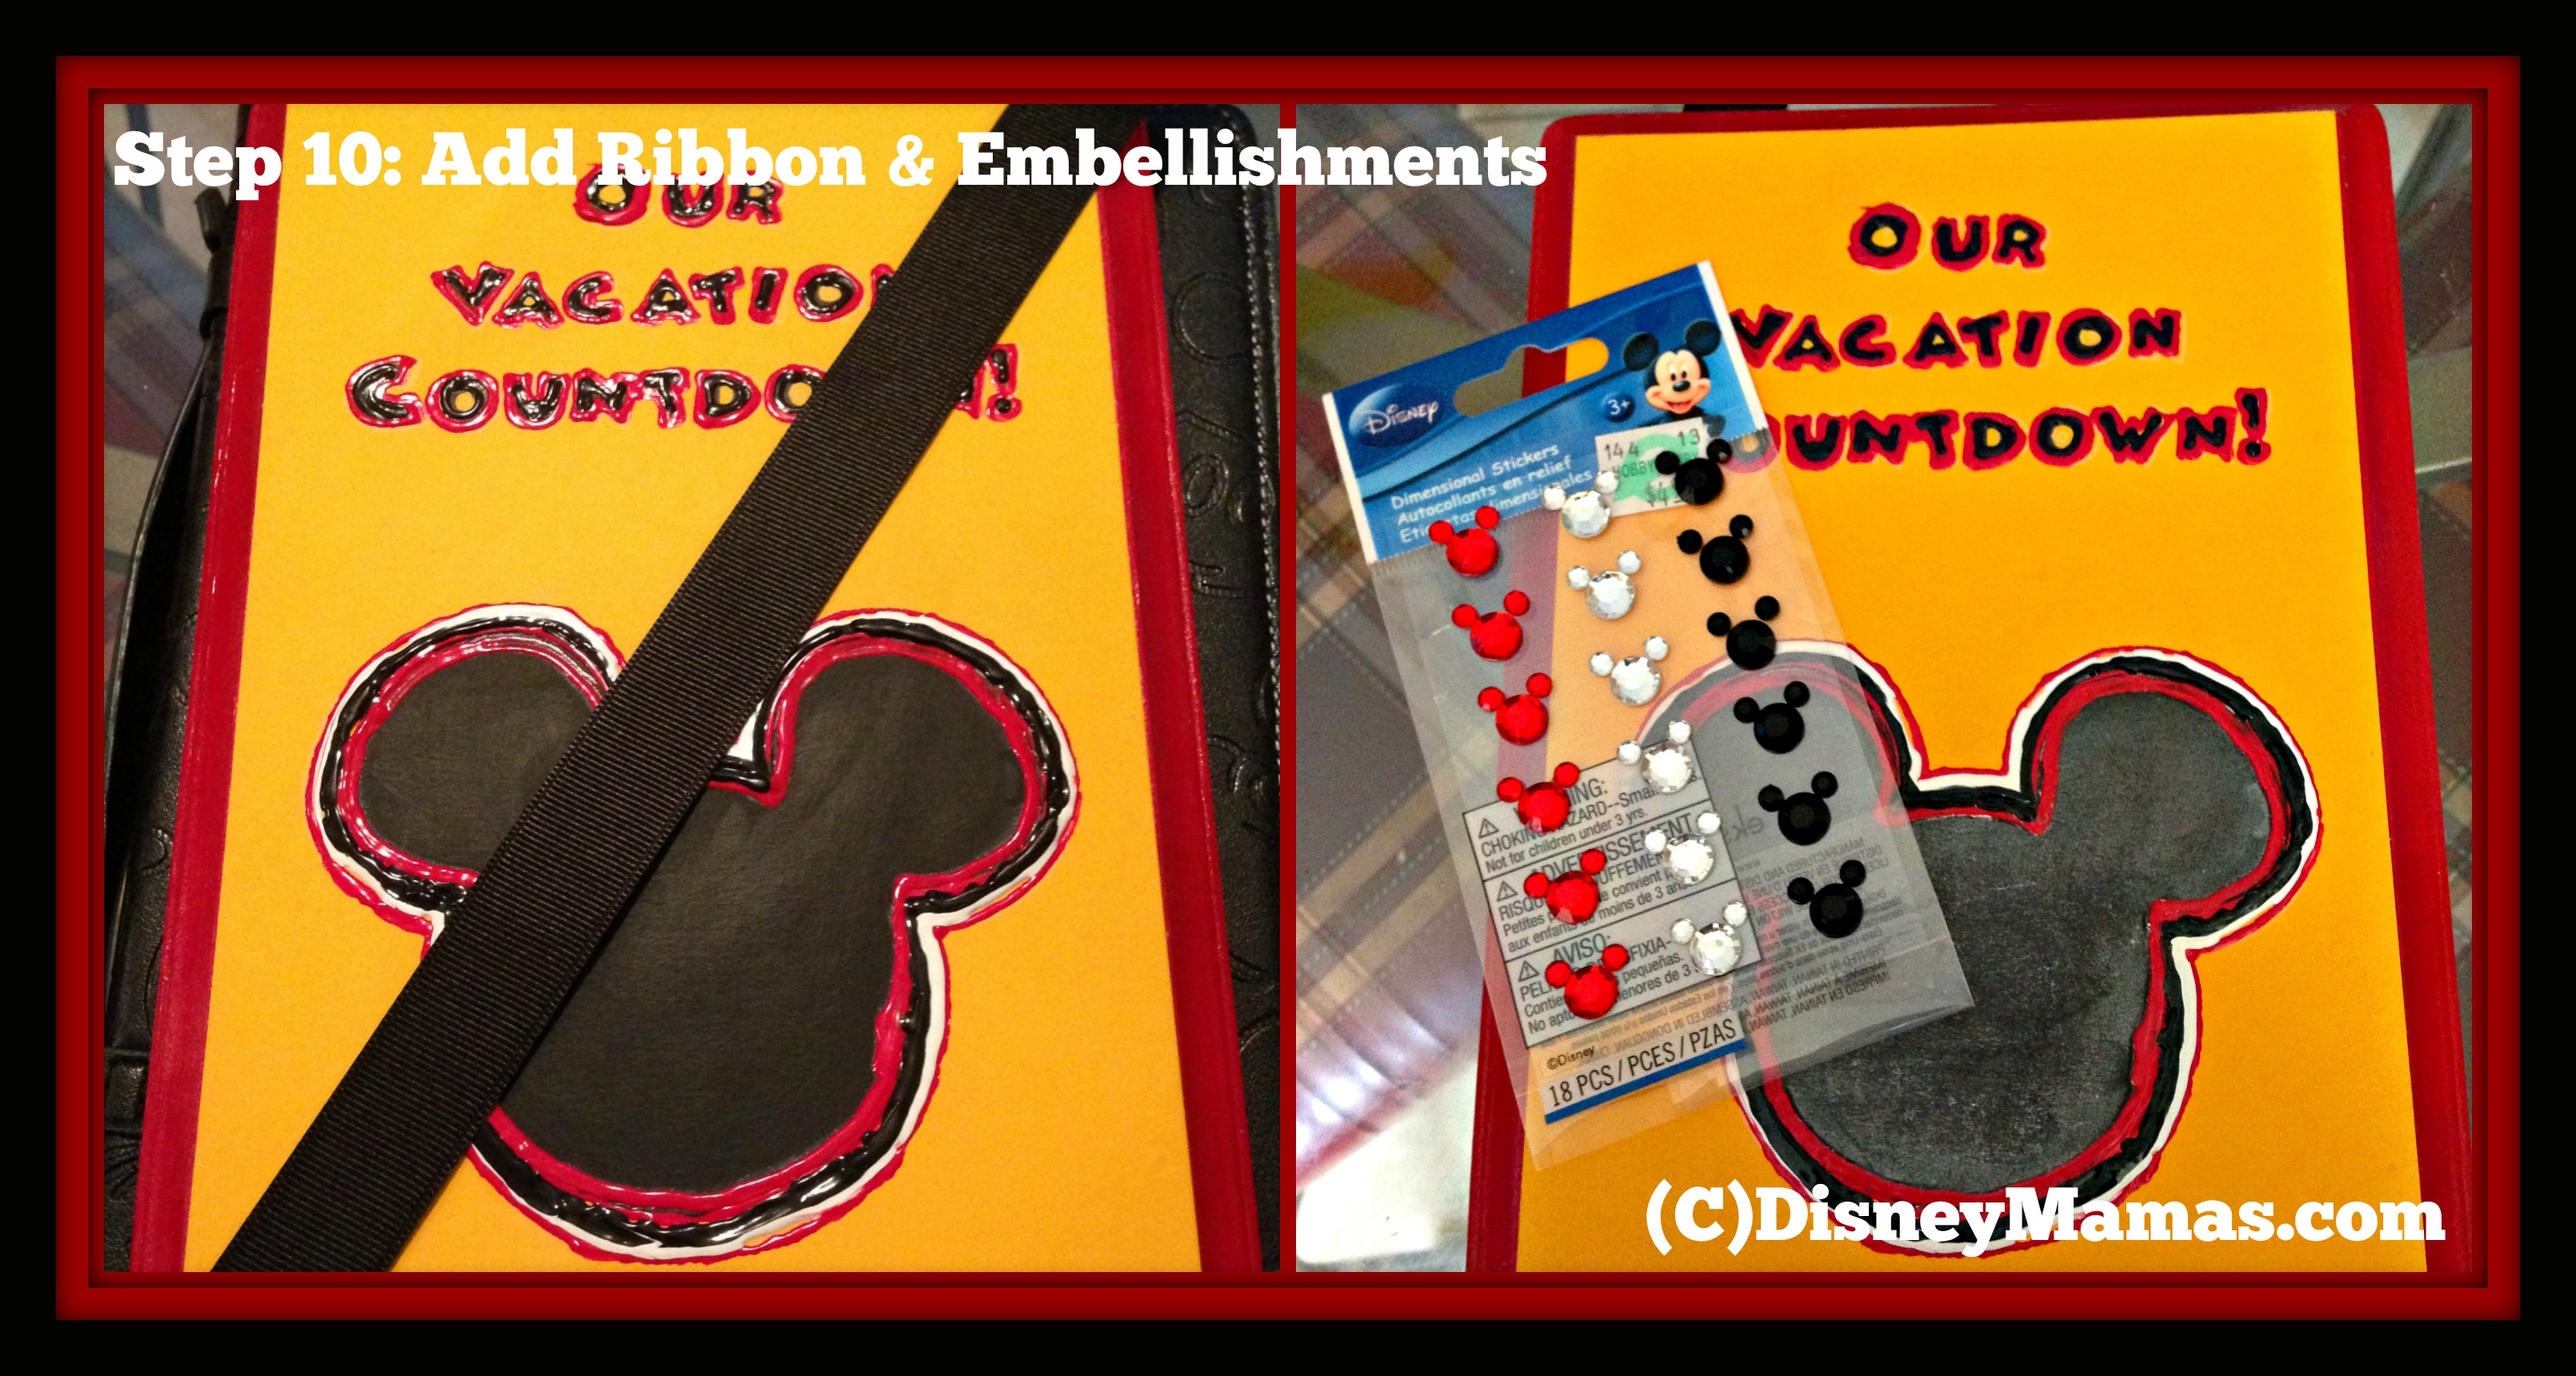
Step Ten: Attach a ribbon, or use magnets. This just depends on where you want to hand your calendar. You could also just set it on a shelf. Add any embellishments you wish and start counting down until your next vacation!
This probably took 2 hours total to complete, but it was spread out over a few days. It was quite simple, and a lot of fun to create! I’m happy with the results, and I hope you enjoy creating your own Disney Countdown Calendar. If you create one please share your pictures with us on our Disney Mamas Facebook page!

How do you countdown to your next Disney vacation?
check out the other great posts from the Blogorail!
Here is the map of our Blogorail Yellow | Disney DIY
- 1st Stop – Love Our Crazy Life | Make Your Own Disneyland Hotel Headboard
- 2nd Stop – Monorails and Magic | Easy DIY Beaded Earrings Inspired by Disney’s Moana
- 3rd Stop – This Roller Coaster Called Life | Disney Vacation Savings Jar
- 4th Stop – My Favorite Finds | DIY Disney Paint Chip Countdown
- 5th Stop – Disney Mamas | How to Make Your Own Reusable Countdown Calendar


We miss the Disney paints too! The girls always picked a Mickey to take home and about half our home is painted in some shade of Disney color. They still have the color formulas in their computer, so if know the name of the Disney color it can be mixed for you 🙂
Plus they now have them at Wal-mart, though they don’t have the paint chips. 🙁
Someone needs a Cricut for christmas. 😉 No more cutting Mickey Heads for me!!
But I love the chalk paint crafts. Seeing a lot of them now and I am giddy to just start painting everything in site.
I DO need a Cricut! Please tell my husband! LOL!
I agree..you need a cricut! Thank you for addressing the issue of the Mickey Mouse Home Depot paint chips being discontinued. I thought I was the only one mourning their loss! Great idea to use the plaque! We are local to the parks & don’t get to make these, but I could def use them for the holidays! Thanks for linking your post on the Disney Driven Life!
Thanks for inviting me! It was fun! (And I’m not afraid to admit that our plaque has said 6 days since Christmas…)
Great idea! And the best part is that you can use it every year!
Pingback: Loops & News of the Week – April 27, 2014 | My great WordPress blog
Pingback: Loops & News of the Week – April 27, 2014 | The Blogorail
Pingback: DIY Disney Paint Chip Countdown
Pingback: Easy DIY Beaded Earrings Inspired by Disney's Moana | Monorails and Magic
Pingback: Disney DIY - The Blogorail
I was so bummed when the Home Depot stopped making the Mickey heads. I love the idea of a reusable countdown. Great work!
What a cute idea! I miss those Mickey shaped paint chips too.
I remember those mickey head paint chips! We used them in a lot of different ways for our trips. Of course, that may be why they disappeared… Cute new countdown!